Method Chaining For Bootstrap Components With Websharper


Lately I have been playing extensively with WebSharper and have been working on improving the structure and reusability of Bootstrap components built with WebSharper. I like writing HTML from F# as it allows me to reuse code by using namespaces and modules to group reusable functions and elements. Over the last couple of month, I have tried many ways to make functions which facilitate the creation of Bootstrap components and tried many ways to group them into meaningful modules so that it is easily findable for the next time I want to use them. Out of all the solutions I’ve tried, only one really stood out and it is what I want to share today - Method chaining to build Bootstrap components.
If you want to follow this tutorial, here are the steps that I took before starting to write any code:
- Getting WebSharper templates from github here,
- Create a new WebSharper.UI.Next single page application
- Add bootstrap CSS and JS in index.html
Method chaining
Method chaining comes from the OOP world. It is the act of creating methods on an object which alters the object and returns itself. For example, we could do the following:
1
2
3
4
var dog = new Dog()
            .WithName(“Cookie”)
            .WithOwner(“Kim”)
            .WithAge(“5”)
Each .Withxxx() methods return dog instance with its property altered. Method chaining is usually used in Fluent API to build human readable api methods and make the discovery of methods easier.
But how does Method chaining will help us with WebSharper and Bootstrap?
Bootstrap has a lot of UI components and each elements have multiple configurations. For example, a form can align its inputs vertically, horizontally or inline all the inputs.The nav tabs can be displayed as tabs or pills and when it is displayed as pills, it can be represented vertically. Bootstrap offers a rich set of components that can be used to suit our needs and the best way to know it all is to read the documentation. Read for the first time the documentation is good but reading the documentation over and over again hoping to know by heart the whole framework isn’t a great solution, at least it doesn’t work for me as I tend to forget after few hours… So we need an abstraction of Bootstrap in F# which will allows us to easily discover all the features and configurations of Bootstrap. This can be achieved with the help of Method chaining.
WebSharper and HTML
WebSharper exposes some functions to create HTML tags under WebSharper.UI.Next.Html. Each HTML tag has its equivalent, for <div> you will find div to create divs without attributes or divAttr for those with attributes, for <table> you will have table and tableAttr. To specify attribute you can use Attr or attr like so pAttr [ attr.class “text-muted” ] [ text “Hello world.” ]. The first argument of each xAttr function takes a list of attr and the second argument is a list of Doc. A Doc is a representation of a DOM element, it can be any ensemble of elements.
For this tutorial, we will take as example the creation of Nav tabs as it is quite complex already and there are few ways to configure tabs which we will look at.
For example one possibility of creating Nav tabs would be:
1
2
3
4
5
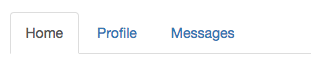
<ul class="nav nav-tabs">
<li role="presentation" class="active"><a href="#">Home</a></li>
<li role="presentation"><a href="#">Profile</a></li>
<li role="presentation"><a href="#">Messages</a></li>
</ul>
Which translates to this with WebSharper:
1
2
3
4
5
ulAttr [ attr.``class`` “nav nav-tabs” ]
       [ liAttr [ Attr.Create “role” “presentation”
                  attr.``class`` “active” ]
                [ aAttr [ attr.href “#” ] [ text “Home" ]  ]
...
As you can see it mimics quite closely the HTML but it involves a lot of strings to define the CSS classes and the attributes. If I wanted to reuse this element, I would have to rewrite it. On top of that, it takes quite some time to understand again what the code is actually modelling. Also this is only one possible way to create Nav tabs. There are many other possibilities like what we talked earlier.
So how can I expose the power of Bootstrap without having to rewrite the WebSharper HTML code?
We will do it in two steps:
- List down all the possible combinations
- Use Method chaining to build a comprehensive Nav tabs type
List down the combinations
First we will start by looking at the possibilities offered by Nav tabs. I have listed below the combinations that I found (I probably forgot some but that will be enough to convey the idea behind this post).
- The Nav can be display as tabs
- The Nav can be display as pills
- The Nav can be justified (take the whole width available)
- Pills can be stacked vertically
- Tabs can have an active state
- Tabs can have a disable state
From this list we can already separate the possibilities in three groups:
- A group affecting the Nav in general
- A group affecting only single tabs
- A group affecting pills only
Now that we are aware of the possibilities, we can start writing our NavTabs type. Taking the configurations affecting the Nav in general, we defines whether the Nav is displayed as tabs or pills and whether it is justified or not:
1
2
3
4
5
6
7
8
type NavTabs = {
     Tabs: NavTab list
     NavTabType: NavTabType
     IsJustified: bool
}
and NavTabType =
| Normal
| Pill
Then we can move on to the tabs which can have different states affecting their display: normal, active or disabled:
1
2
3
4
5
6
7
8
9
10
type NavTab = {
     Id: string
     Text: string
     Content: Doc
     State: NavTabState
}
and NavTabState =
| Normal
| Active
| Disabled
Lastly we need to revisit our NavTabType as our last requirement is to allow pills to be stacked. We do that by specifying it in the NavTabType:
1
2
3
4
5
6
7
8
9
10
11
type NavTabs = {
     Tabs: NavTab list
     NavTabType: NavTabType
     IsJustified: bool
}
and NavTabType =
| Normal
| Pill of PillStack
and PillStack =
| Horizontal
| Vertical
Here’s the complete code of the NavTabs type:
1
2
3
4
5
6
7
8
9
10
11
12
13
14
15
16
17
type NavTabs = {
     Tabs: NavTab list
     NavTabType: NavTabType
     IsJustified: bool
}
and NavTab = {
     Id: string
     Text: string
     Content: Doc
     State: NavTabState
}
and NavTabType =
| Normal
| Pill of PillStack
and PillStack =
| Horizontal
| Vertical
Now we have all the configurations in and if we want to create Nav tabs composed by three tabs, justified with pills in a vertical layout, we would write the following:
1
2
3
4
5
6
7
8
9
let nav = {
     Tabs = [ { Id = “first-tab”
                Text = “First tab”
                Content = Doc.Empty
                State = Active }
              { ... other tabs ... } ]
     NavTabsType = Pill Vertical
     IsJustified = true
}
As we can see, we need to specify all members even if most of the time we will have the same configuration. But even though most of the time we will use a default configuration, it is important to give the possibility to construct all the facets of the component. And because there might be many facets, that’s where we will use Method chaining to construct a human readable set of functions to help us initialise it.
Method chaining with NavTabs
As we explaining at the beginning, the purpose of Method chaining is to provide a set of functions which are human readable and which make it easy to discover what kind of configuration we can have for our types. The first thing we need to do is to have a function to create the type in a default state:
1
2
3
4
5
type NavTabs with
     static member Create() =
        { Tabs = []
          NavTabType = Normal
          IsJustified = false }
We are now in a better position to create Nav tabs as we can just call NavTabs.Create().
What we need next is to make the other configurations available.
We will do that by following the .Withxxx() pattern we employed in our example of Method chaining.
On the NavTabs type we will then have:
1
2
3
4
5
6
7
8
9
10
11
type NavTabs with
     static member Create() =
        { Tabs = []
          NavTabType = Normal
          IsJustified = false }
     member x.WithTabs tabs =
        { x with Tabs = tabs }
     member x.Justify isJustified =
        { x with IsJustified = isJustified }
     member x.WithNavTabType navTabType =
        { x with NavTabType = navTabType }
We do the same for the NavTab type:
1
2
3
4
5
6
7
8
9
10
11
12
type NavTab with
    static member Create id =
        { Id = id
          Title = ""
          Content = Doc.Empty
          State = NavTabState.Normal }
    member x.WithContent doc =
        { x with Content = doc }
    member x.WithTitle title =
        { x with Title = title }
    member x.WithState state =
        { x with State = state }
Now to create the same example as before (three tabs, pills and justified), we can write:
1
2
3
4
5
6
7
8
9
10
11
let tabs =
    NavTabs.Create()
            .Justify(true)
            .WithType(Pill Vertical)
            .WithTabs(
                [ NavTab.Create("home")
                        .WithTitle("Home")
                        .WithContent(text "Home page here.")
                        .WithState(NavTabState.Active)
                  ... other tabs ...
                ])
This code is longer than before but this is much more understandable as we know exactly what we are creating.
Also, every time you hit . (at least on VS), you will get an autocompletion which is helpful to discover all the available configurations.
Most importantly, when you want to just create default Nav tabs (with tabs horizontal, non justified) you just need to write:
1
2
3
4
5
6
7
8
9
let nav = NavTabs.Create().WithTabs([ ... tabs here ... ])

... equivalent to ...

let nav = {
     Tabs = [ ... tabs here... ]
     NavTabsType = Horizontal
     IsJustified = false
}
We are now done with creating the Nav tabs, the last bit remaining is to render it. To do that we need to take our crafted records and transform it to a WebSharper Doc.
The Nav tabs Bootstrap component is kind of special as it is composed by two distinct components: the tabs and the contents. Because of that we will need two render functions on NavTabs and NavTab to render the tabs and the contents.
Let start by NavTab with RenderTab() and RenderContent():
1
2
3
4
5
6
7
8
9
10
11
12
13
14
15
16
17
18
19
20
21
22
23
24
25
type NavTab with
     member x.RenderTab() =
        liAttr [ attr.role "presentation"
                 attr.``class`` (match x.State with
                                 | NavTabState.Normal -> ""
                                 | NavTabState.Active -> "active"
                                 | NavTabState.Disabled -> "disabled") ]
               [ (match x.State with
                  | NavTabState.Disabled ->
                        aAttr [ attr.href “#” ] [ text x.Title ]
                  | _ ->
                        aAttr [ attr.href ("#" + x.Id)
                                Attr.Create “role” “tab"
                                Attr.Create “data-toggle” “tab” ]
                              [ text x.Title ]) ]

     member x.RenderContent() =
        divAttr [ Attr.Create “role" "tabpanel"
                  attr.id x.Id
                  attr.``class`` (match x.State with
                                  | NavTabState.Active ->
                                        "tab-pane fade in active"
                                  | _ ->
                                        "tab-content tab-pane fade") ]
                [ x.Content ]
The Render functions transform our crafted record type to a WebSharper Doc by pattern matching over all the configurations and translating it to the correct HTML and CSS classes.
We do the same for NavTabs:
1
2
3
4
5
6
7
8
9
10
11
12
type NavTabs with
     member x.RenderTabs()=
        ulAttr [ attr.``class`` ("nav "
                                 + (if x.IsJustified then "nav-justified " else "")
                                 + (match x.NavTabType with
                                    | Normal -> "nav-tabs"
                                    | Pill Horizontal -> "nav-pills"
                                    | Pill Vertical -> "nav-pills nav-stacked")) ]
               (x.Tabs |> List.map NavTab.RenderTab |> Seq.cast)

    member x.RenderContent() =
        divAttr [ attr.``class`` "tab-content" ] (x.Tabs |> List.map NavTab.RenderContent |> Seq.cast)
Finally we can call Render() on the NavTabs record to get a Doc and display it on the page.
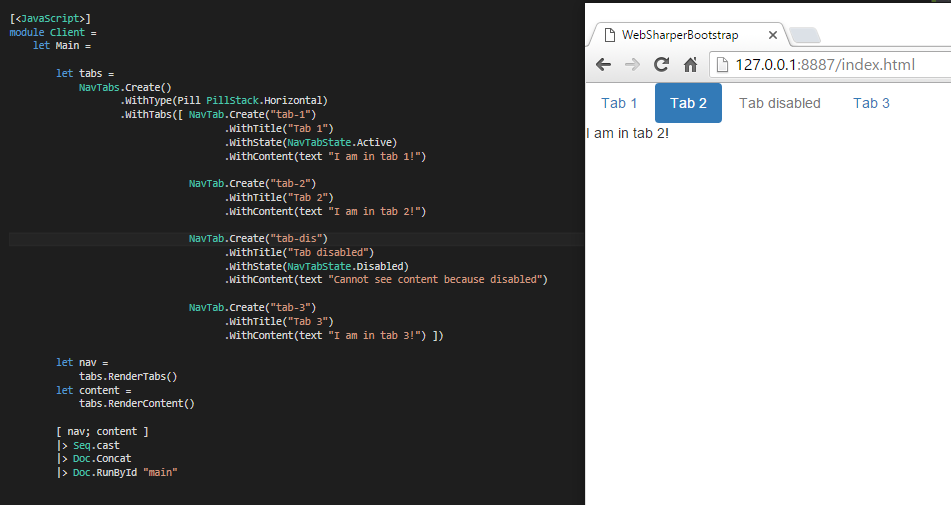
The result code to create Nav tabs is the following:
1
2
3
4
5
6
7
8
9
10
11
12
let tabs = ... creation of Nav tabs ...

let nav =
    tabs.RenderTabs()
let content =
    tabs.RenderContent()

[ nav; conntent ]
|> Seq.cast
|> Doc.Concat
|> Doc.RunById "main"
And here is the result:
Conclusion
Today we explored a way of creating (kind of) a DSL to build Bootstrap components with WebSharper in F# using Method chaining.
This approach has the advantage of being very flexible and easy to extend. With the code being very readable it is easy, even after few months, to understand it. Another good point is that it facilitates other developers none familiar with Bootstrap to create UI components as the DSL guides them to configure the elements.
The drawback is that it takes time to build the functions and sometime the Render functions aren’t straight forward.
Overall I think the advantages win over the drawbacks because of the readability and the maintainability.
This approach isn’t specific to Bootstrap or WebSharper. It can be applied to any kind of UI abstraction where it is beneficial to create a DSL which builds UI elements in a friendly way.
I have created many more components for Bootstrap and you can have a look here http://kimserey.github.io/WebSharperBootstrap/. I hope you enjoyed reading this post! As usual, if you have any comments hit me on twitter @Kimserey_Lam, thanks for reading!


