Angular With Signalr Core


Last week we saw how to configure SignalR and get a server notifying a client built as Razor page via Websockets. We completed the post by having a fully functional backend setup with SignalR and authentication done via Resource Owner Password. Today we will see how we can connect to SignalR hub from an Angular application and demonstrate how we can authenticate.
- SignalR server
- Setup an Angular application
- Connect to SignalR hub
- Send messages
- Authentication
1. SignalR server
We won’t be describing the server here, instead we will take from where we left in my previous blog post with the code fully available on my Github https://github.com/Kimserey/signalr-core-sample/tree/master/Example.
Get the repository and run signalr-core-sample/Example. It will run a server on http://localhost:5000 with a SignalR hub on /chathub and Identity server configured with a client my-app setup with Resource owner password flow.
2. Setup an Angular application
Once we have the server running, we can create the Angular application which will connect to it. We start first by creating a new project.
1
ng new signalr-core-sample-client
And we install SignalR with the following command:
1
npm install @aspnet/signalr --save
We will be making a small live chat hence we will be using PrimeNG for its Angular UI components.
1
2
npm install primeng --save
npm install primeicons --save
The we add the css files from PrimeNG in angular.json under styles:
1
2
3
4
5
6
"styles": [
  //...other styles
  "node_modules/primeicons/primeicons.css",
  "node_modules/primeng/resources/themes/omega/theme.css",
  "node_modules/primeng/resources/primeng.min.css"
],
Now that all the necessary libraries are downloaded, we can start by connecting to our hub and sending messages.
3. Connect to SignalR hub
We start first by creating a service which will allow us to connect to the hub.
1
2
3
4
5
6
7
8
9
10
11
12
13
14
15
16
17
18
19
20
21
22
23
24
25
26
27
28
29
30
import { Injectable } from '@angular/core';
import * as signalR from "@aspnet/signalr";

@Injectable({
    providedIn: 'root',
})
export class MessageService {
  private connection: signalR.HubConnection;

  connect(accessToken) {
    if (!this.connection) {
      this.connection = new signalR.HubConnectionBuilder()
        .withUrl("http://localhost:5000/chathub", { accessTokenFactory: () => accessToken })
        .build();

      this.connection.on("receive", (user, msg) => {
        console.log('Received', user, msg)
      });

      this.connection.start().catch(err => console.error(err));
    }
  }

  disconnect() {
    if (this.connection) {
      this.connection.stop();
      this.connection = null;
    }
  }
}
Our service contains connect and disconnect which will establish a connection to SignalR hub. On reception of messages, we print to console for the moment.
Because we can’t have the accessToken yet, we can test this by disabling the authentication and allow anonymous submission of messages by removing the [Authorization] attribute on the Hub on the server. If we do that, we can then connect to the hub in the OnInit of the AppComponent:
1
2
3
4
5
6
7
8
9
10
11
12
13
14
15
16
17
18
19
20
21
22
import { Message } from './message.model';

import { Component, OnInit } from '@angular/core';
import { FormBuilder, FormGroup, Validators, FormControl } from '@angular/forms';
import { AuthService } from './auth.service';
import { MessageService } from './message.service';
import { Subscription } from 'rxjs';

@Component({
  selector: 'app-root',
  templateUrl: './app.component.html',
  styleUrls: ['./app.component.css']
})
export class AppComponent implements OnInit {
  title = 'app';

  constructor(private notification: MessageService) { }

  ngOnInit() {
    this.notification.connect("");
  }
}
4. Send messages
We are now able to connect, the next part is to be able to send messages. To do that, we will add a form to submit messages and display those messages back on the screen.
We start first by modifying the MessageService and we introduce a Subject which will emit new messages instead of console.log.
1
2
3
4
5
6
7
8
9
10
11
12
13
14
15
16
17
18
19
20
21
22
23
24
25
26
27
28
29
30
31
32
33
34
35
36
37
import { Injectable } from '@angular/core';
import * as signalR from "@aspnet/signalr";
import { Subject } from 'rxjs';
import { Message } from './message.model';

@Injectable({
    providedIn: 'root',
})
export class MessageService {
  private connection: signalR.HubConnection;
  message = new Subject<Message>();

  connect(token) {
    if (!this.connection) {
      this.connection = new signalR.HubConnectionBuilder()
        .withUrl("http://localhost:5000/chathub", { accessTokenFactory: () => token })
        .build();

      this.connection.on("receive", (user, content) => {
        this.message.next({ user, content });
      });

      this.connection.start().catch(err => console.error(err));
    }
  }

  send(message) {
    this.connection.invoke("SendMessage", message).catch(err => console.error(err));
  }

  disconnect() {
    if (this.connection) {
      this.connection.stop();
      this.connection = null;
    }
  }
}
Notice that we have created a model called message.model.
1
2
3
4
export interface Message {
  user: string;
  content: string;
}
We can then subscribe to the messages from AppComponent:
1
2
3
4
5
6
7
8
9
10
11
12
13
14
15
16
17
18
19
20
@Component({
  selector: 'app-root',
  templateUrl: './app.component.html',
  styleUrls: ['./app.component.css']
})
export class AppComponent implements OnInit {
  title = 'app';

  messages: Message[] = [];
  notificationSubscription: Subscription;

  constructor(private notification: MessageService) { }

  ngOnInit() {
    this.notificationSubscription = this.notification.message.subscribe(msg => {
      this.messages.push(msg);
    });
    this.notification.connect("");
  }
}
Next we build a form to send messages and add a submit function:
1
2
3
4
5
6
7
8
9
messageForm = this.fb.group({
  message: ['Hello world!', Validators.required]
});

onSubmit() {
  this.notification.send(this.messageForm.getRawValue().message);
}

constructor(private fb: FormBuilder, private notification: MessageService) { }
And we use the messageForm in our html template to construct a form allowing us to send messages:
1
2
3
4
5
6
7
8
9
10
11
12
13
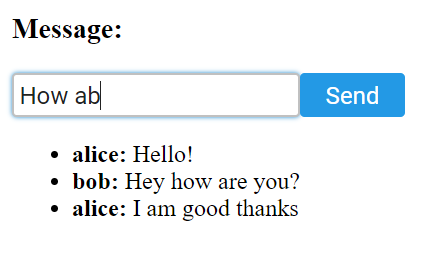
<form [formGroup]="messageForm" (ngSubmit)="onSubmit()">
<h3>Message:</h3>
<input pInputText type="text" formControlName="message" />
<p-button type="submit" label="Send" [disabled]="!messageForm.valid"></p-button>
</form>
<div>
<ul>
<li *ngFor="let msg of messages">
<b>:</b>
</li>
</ul>
</div>
We should now be able to send and receive messages!
5. Authentication
From the beginning we have disabled the authentication on the server. We can now add it back as we will be implementing a login mechanism on the Angular client. So we start by re-enabling the authentication on the server by adding back the [Authorize] attribute. Once added, we are no longer allowed to connect straight away to the hub.
To be able to connect, we now need to provide the access_token. Our server is configured with Identity Server 4 with a client using Resource Owner Password flow:
1
2
3
4
5
6
7
8
9
.AddInMemoryClients(new[] {
    new Client {
        ClientId = "my-app",
        ClientName = "my-app",
        ClientSecrets = { new Secret("secret".Sha256()) },
        AllowedScopes = { "my-api" },
        AllowedGrantTypes = GrantTypes.ResourceOwnerPassword
    }
})
Resource Owner Password flow allows us to use HTTP POST to directly hit the /connect/token endpoint and retrieve a token. We create a AuthService which logs in and POST the request to /connect/token passing the username and password.
1
2
3
4
5
6
7
8
9
10
11
12
13
14
15
16
17
18
19
20
21
22
23
24
25
26
27
28
29
30
31
32
33
34
35
import { Injectable } from '@angular/core';
import { HttpClient, HttpParams, HttpHeaders } from '@angular/common/http';
import { map } from 'rxjs/operators';

export interface TokenResponse {
  access_token: string,
  expires_in: number,
  token_type: "Bearer"
}

@Injectable({
  providedIn: 'root'
})
export class AuthService {

  public login(user, password) {
    const body = new HttpParams()
      .set("grant_type", "password")
      .set("client_id", "my-app")
      .set("client_secret", "secret")
      .set("scope", "my-api")
      .set('username', user)
      .set('password', password);

    const options = {
      headers: new HttpHeaders()
        .set('Content-Type', 'application/x-www-form-urlencoded')
    };

    return this.http.post<TokenResponse>("http://localhost:5000/connect/token", body, options)
      .pipe(map(x => x.access_token));
  }

  constructor(private http: HttpClient) { }
}
Once the reponse is received, we pipe it with a map which selects the access_token resulting in an Observable<string> representing an Observable of access token. In order to authenticate, we create a modal which prompt the user to log in on init of the AppComponent. The modal contains a login form with username and password:
1
2
3
4
5
6
7
8
9
10
11
12
13
14
15
16
17
18
19
20
21
22
23
24
25
26
27
28
29
30
31
32
33
34
35
36
37
38
39
40
41
42
43
44
45
46
47
48
49
50
@Component({
  selector: 'app-root',
  templateUrl: './app.component.html',
  styleUrls: ['./app.component.css']
})
export class AppComponent implements OnInit {
  title = 'app';

  messages: Message[] = [];

  messageForm = this.fb.group({
    message: ['Hello world!', Validators.required]
  });
  notificationSubscription: Subscription;

  loginForm = this.fb.group({
    username: ['alice', Validators.required],
    password: ['password', Validators.required]
  });
  display: boolean;
  loginSubscription: Subscription;

  constructor(private fb: FormBuilder, private notification: MessageService, private auth: AuthService) { }

  onSubmit() {
    this.notification.send(this.messageForm.getRawValue().message);
  }

  logIn() {
    const value = this.loginForm.getRawValue();

    if (!!this.loginSubscription)
    {
      this.loginSubscription.unsubscribe();
    }

    this.loginSubscription = this.auth.login(value.username, value.password)
      .subscribe(token => {
        this.notification.connect(token);
        this.display = false;
      });
  }

  ngOnInit() {
    this.notificationSubscription = this.notification.message.subscribe(msg => {
      this.messages.push(msg);
    });
    this.display = true;
  }
}
The display variable is used to control the visibility of the modal. On init of AppComponent, we set display to true. Then we created a logIn function which gets the value of the login form and calls auth.login from our AuthService. Once the token is retrieved, we connect to the hub passing in the token this.notification.connect(token). Here is the code for the modal:
1
2
3
4
5
6
7
8
9
10
11
12
13
14
15
16
17
<p-dialog header="Login" [(visible)]="display" modal="true">
  <span>alice/password</span>
  <br/>
  <span>bob/password</span>

  <form [formGroup]="loginForm" (ngSubmit)="logIn()">
    <div>
      <input pInputText type="text" placeholder="username" formControlName="username" />
    </div>
    <div>
      <input pInputText type="password" placeholder="password" formControlName="password" />
    </div>
    <div>
      <p-button type="submit" label="Log in" [disabled]="!loginForm.valid"></p-button>
    </div>
  </form>
</p-dialog>
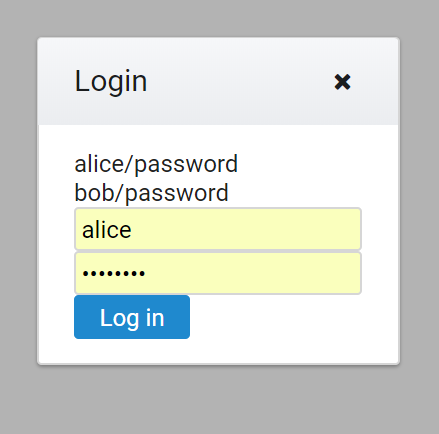
We should now have a prompt asking us to log in everytime we navigate to http://localhost:4200. Once log in, we are able to send messages under our authenticated user. And that concludes today’s post!
The source code is fully available on my GitHub:
- Server ASP NET Core code https://github.com/Kimserey/signalr-core-sample (under Example)
- Client Angular code https://github.com/Kimserey/signalr-core-sample-ng
Conclusion
Today we saw how to setup SignalR to work with Angular. We saw how we could setup a service with an observable to handle the asynchronousy of push events from the server. We also saw how we could use PrimeNG to create a login prompt and lastly we saw how we could authenticate to a resource owner password backend using an auth service. Although bear in mind that resource owner password is never recommended and this is used for a quick example of authentication of SignalR but similar implementation can be achieve with Implicit flow. Hope you like this post, see you next time!


