Hashicorp Vault With Aspnetcore


Last week I talked about Hashicorp Vault and how it could be used to store secrets. Today I will continue on the same line and show how we can host Vault behind IIS and use what we learnt in the previous post to retrieve secrets from ASP.NET Core.
- Setup Vault
- Read secrets from Vault from ASP.NET Core
1. Setup Vault
Vault is a webserver which comes with a complete API. In this example, we will show how to setup Vault and proxy calls from IIS to Vault.
1.1 Boot Vault
To begin with, we can follow the same steps described in my previous post - Hashicorp Vault and how it could be used to store secrets. As a quick overview, here are the steps to be executed inside Windows Server:
- download Vault
- create the config.hcl file
- run the command
vault.exe server -config=config.hcl
In config.hcl, we configured Vault to listen on http://localhost:8200 so the next thing to do is to proxy calls from IIS to Vault process.
1.2 Configure IIS to direct calls to Vault process
We assume that we alaready have an ASP.NET Core application registered as a Website on IIS. If you aren’t familiar with ASP.NET Core with IIS, you can refer to my blogpost on how to setup an ASP.NET Core application behind IIS.
1.2.1 Prepare the ASP.NET Core application
By default IIS only allows to register websites. In this sample we will be hosting our sample application, this application contains a single endpoints GET /secrets which returns a database connection secrets.
To host it, we start by compiling the artefact with dotnet publish -c Release. Then we copy the files from the publish folder into the server and create a IIS Website and specify the location as physical path of the website. (If you are having issue with serving your application, make sure you have installed the dotnet runtime and AspNetCore runtime on the server and that you have installed the IIS module for ASP.NET Core as explained in my previous post).
From within the server, if our installation of the application has been successful, we can open PowerShell and execute Invoke-WebRequest we should get the following:
PS> Invoke-WebRequest -Uri "http://localhost/secrets"

StatusCode        : 200
StatusDescription : OK
Content           : {"databaseConnection":null}
This is the code of the controller:
1
1.2.2 Setup Vault as sub application
Now that we have the application running on *:80, we can install Vault as a sub application on a path *:80/vault.
For the physical path of this sub application, we can create a folder in the application itself, this folder will be used to save the web.
What we want is when someone hit myapp.com or myapp.com/abc, it will hit our ASP.NET Core application but when someone hits myapp.com/vault or myapp.com/vault/v1/secret/myapp, it will hit Vault.
To do that we will need two IIS modules:
- URL rewrite https://www.iis.net/downloads/microsoft/url-rewrite
- Application Request Routing (ARR) https://www.iis.net/downloads/microsoft/application-request-routing
After we have installed the modules, we can create web.config under the Vault folder with the following content:
1
2
3
4
5
6
7
8
9
10
11
12
13
<?xml version="1.0" encoding="UTF-8"?>
<configuration>
    <system.webServer>
        <rewrite>
            <rules>
                <rule name="Rewrite to vault" patternSyntax="Wildcard">
                    <match url="*" />
                    <action type="Rewrite" url="http://localhost:8200/{R:1}" />
                </rule>
            </rules>
        </rewrite>
    </system.webServer>
</configuration>
This will configure the URL rewrite to forward anything after the /vault prefix to the process hosted on *:8200.
By default IIS does not allow proxying to a different domain so when the request comes from myapp.com/vault/[...], it isn’t possible to reroute it to localhost:8200/[...].
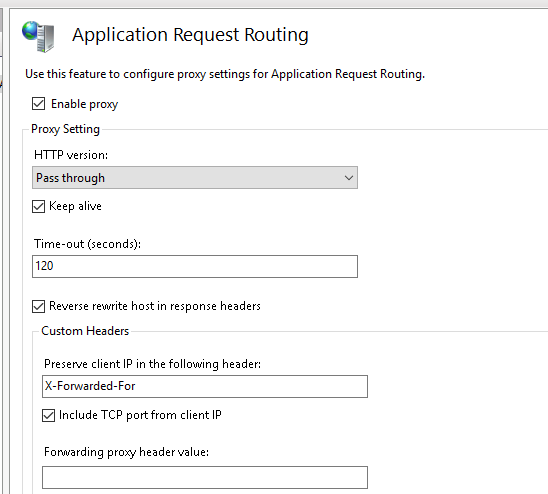
To enable that, we will make use of ARR which we already downloaded and installed. To activate it, we need to go to main server configuration and click on Application Request Routing under IIS.
Then go to Proxy > Server Proxy Settings and enable Pass Through proxying.
Now that we have it setup, we should be able to hit Vault API from the path:
PS> Invoke-WebRequest -Uri "http://localhost/vault/v1/secret/myapp" -Headers @{"x-vault-token"="[your token]"}


StatusCode        : 200
StatusDescription : OK
Content           : {"request_id":"b1d99860-b330-5a15-203a-06352154291e", "lease_id":"","renewable":false,"lease_duration":2764800,"data":{"databaseConnection":"123abc"},"wrap_info":null,"warnings":null,"auth":null}
We have completed the configuration of IIS and now have all calls routed to our application for those on *:80 and for those with a prefix of *:80/vault routed to Vault which is listening on http://localhost:8200.
2. Read secrets from Vault from ASP.NET Core
In order to consume Vault secrets from ASP.NET Core, we will use VaultSharp.
Again assuming that we have configured an AppRole authentication which gives an identity to our application and allows it to authenticate to Vault using clientId and secretId. This was explain in my previous post on how to get started with Vault.
To use AppRole, we can directly call the VaultClientFactory passing the address and the AppRoleAuthenticationInfo.
1
2
3
4
IVaultClient vaultClient = VaultClientFactory.CreateVaultClient(
    new Uri("http://localhost:8200"),
    new AppRoleAuthenticationInfo("myroleid", "mysecretid")
);
Then using the IVaultClient, we query our secrets.
1
var vaultSecrets = vaultClient.ReadSecretAsync("secret/myapp").Result.Data;
Using this process of retrieval, we construct an extension to the configuration builder which adds a memory collection containing the secrets from Vault.
1
2
3
4
5
6
7
8
9
10
11
12
13
14
15
16
17
18
19
20
21
22
23
24
25
26
27
28
29
30
31
32
33
34
public static IConfigurationBuilder AddVault(this IConfigurationBuilder builder)
{
    var buildConfig = builder.Build();

    if (buildConfig.GetSection("settings:useVault").Get<bool>())
    {
        try
        {
            IVaultClient vaultClient = VaultClientFactory.CreateVaultClient(
                new Uri("http://localhost:8200"),
                new AppRoleAuthenticationInfo(
                    buildConfig["vault:roleid"],
                    buildConfig["vault:secretid"]
                )
            );

            var vaultSecrets = vaultClient
                    .ReadSecretAsync("secret/myapp")
                    .Result
                    .Data
                    .Select(x => new KeyValuePair<string, string>($"vault:{x.Key}", x.Value.ToString()));

            return builder.AddInMemoryCollection(vaultSecrets);
        }
        catch (Exception ex)
        {
            throw new Exception("Vault configuration failed: " + ex.Message);
        }
    }
    else
    {
        return builder;
    }
}
We then call it from Program.cs.
1
2
3
4
5
public static IWebHost BuildWebHost(string[] args) =>
    WebHost.CreateDefaultBuilder(args)
        .UseStartup<Startup>()
        .ConfigureAppConfiguration(builder => builder.AddVault())
        .Build();
Now that the application is setup to read from Vault, we need to get the roleid and secretid from Vault.
Assuming that you have setup Vault AppRole and have created a policy to access secret/myapp attached to a role as explained in my previous post.
The roleid never changes as it is generated when the role is created. Therefore we retrieve it vault read auth/approle/role/myapp/role-id then add it as environment variable for it to be available globally on the machine.
Next we can retrieve the secretid using vault write -f auth/approle/role/myapp/secret-id and set it directly either in IIS configuration environment variable or in web.config in the webserver. Do not add/commit the secret in the code.
In the web.config, it can be added like so:
1
2
3
4
5
<aspNetCore processPath="dotnet" arguments=".\VaultTest.dll" stdoutLogEnabled="false" stdoutLogFile=".\logs\stdout">
    <environmentVariables>
        <environmentVariable name="vault:secretid" value="..." />
    </environmentVariables>
</aspNetCore>
Now that we have added the role id and the secret id, we can execute the webrequest.
PS> Invoke-WebRequest -Uri "http://localhost/secrets"


StatusCode        : 200
StatusDescription : OK
Content           : {"databaseConnection":"123abc"}
We can see that our application was now able to boot and access the secrets from Vault. Our secrets can now be saved safely in Vault, the role id can be distributed on the VM as an environment variable while the secret can be distributed during the deployment of the application by adding it to the web.config as local environment variable to the application. Vault encrypts all secrets and they are never accessible in a persisted state as plain text. Only the secret can be seen as plain text but it is tied with a TTL which reduces the risks. Lastly in this manner all secrets only transit between Vault and the application who owns them, reducing the risk of eavesdropping.
Conclusion
Today we saw how we could use Vault with AppRole and store our secrets to be used by an ASP.NET Core application. While doing that we also seen how we could host Vault and our application on Windows Server and how we could configure IIS to route all traffic coming into the server. Finally we explored how to consume secrets and inject it into the configuration framework of ASP.NET Core to be used by our application. Hope you liked this post! See you next time!


