Kafka Log Compaction


Kakfa supports multiple log cleanup policy, delete or compact. When set to delete, log segments will be deleted when the size or time limit is reached. When compact is set, Kafka will ensure to keep at least the latest value of messages per message key. With log compaction setup on a Kafka topic, the topic becomes a database where messages are rows in database term, mutation of rows are done via messages where the last message received represents the latest state. In this post we will see how we can setup compaction and the different settings that affect its behaviour.
Log Compaction
In traditional message driven communication, we have logs being added in sequential order where the time matters and each message matters. For example, a chat room, the producer would expect every message to be received and read by the consumer. The deletion strategy for such scenario would be to delete based on time or size - e.g. deleting messages that were sent five years ago.
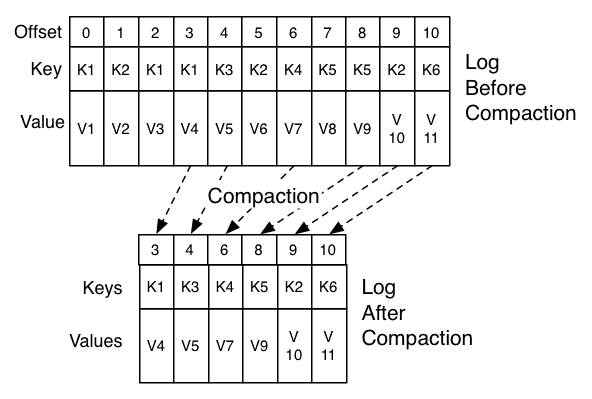
On top of the traditional delete, Kafka offers a different cleanup policy called Log compaction. Log compaction allows the deletion to span accross different messages disregarding the time while keeping only the latest messages per key. This cleanup policy allows us to keep a “clean” topic which only contains the latest messages for each key submitted. Now compaction wouldn’t make sense in our previous chat room example, but consider a different example, the market price of a commodity. If we need a topic with only the most recent prices of each commodity, if we start to subscribe to the topic from the beginning, we wouldn’t need to know about its price fluctuation, all we would want to know would be the most recent price. That’s what compaction allows us to have, a quick and accurate view of the most recent state. Quick and accurate because we delete older versions of the logs hence reduce the amount of logs to traverse when starting from beginning.
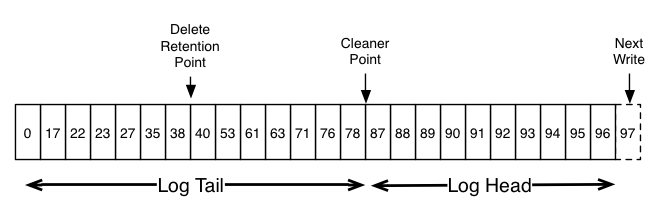
There are multiple settings that are important for settings up compaction, the cleaner point represents the separation between the compacted logs (the tail) and the dirty logs (the head). The head contains the regular logs coming in sequential order, while the tail has been compacted.
Source Compaction documentation
The compaction occurs under different conditions, one of them being the ratio between the compacted logs and the dirty logs min.cleanable.dirty.ratio. This prevents frequent unnecessary compactions. Other settings like min.compaction.lag.ms and max.compaction.lag can be used to make logs available for compaction, or prevent them to be made available for compaction. For example if messages are very frequent, we can reach the ratio quicker than our consumers are able to consume the messages hence if we want to guarantee a consumer to receive updates we can set min.compaction.lag.ms which will prevent a log from being compacted for a specified period. On the opposite, if don’t have a lot of messages and rarely hit the ratio, we can set max.compaction.lag.ms which will define the maximum time a log remains ineligible for compaction.
In order to delete a log completely, a tombstone message can be sent. A tombstone is a message with a null value associated to the key. When compaction occurs, all logs related to the tombstone will be removed. A tombstone is added as a log just like any other log hence consumers will be notified of the deletion, allowing them to perform adequate actions on their end. The delete retention point states how long the tomstone will be kept in the logs - this is important as consumers need to know about a deletion. The delete retention default is 24H but can be set via delete.retention.ms.
Then when compaction is triggered, only the latest state is kept.
Source Compaction documentation
Docker Setup
Now that we understand compaction, we can start our Kafka docker setup which we have created from our previous post.
1
2
3
4
5
6
7
8
9
10
11
12
13
14
15
16
17
18
19
20
version: '2'
services:

  zookeeper:
    image: wurstmeister/zookeeper
    ports:
      - "2181:2181"

  kafka:
    build: .
    ports:
      - "9094:9094"
    environment:
      KAFKA_ZOOKEEPER_CONNECT: zookeeper:2181
      KAFKA_LISTENERS: INTERNAL://kafka:9092,OUTSIDE://kafka:9094
      KAFKA_ADVERTISED_LISTENERS: INTERNAL://kafka:9092,OUTSIDE://localhost:9094
      KAFKA_INTER_BROKER_LISTENER_NAME: INTERNAL
      KAFKA_LISTENER_SECURITY_PROTOCOL_MAP: INTERNAL:PLAINTEXT,OUTSIDE:PLAINTEXT
    volumes:
      - /var/run/docker.sock:/var/run/docker.sock
Note that we aren’t auto creating a topic here as we will be creating it ourselves.
Topic Setup
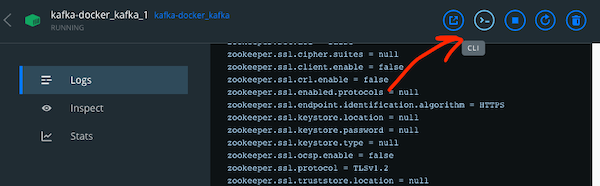
Next we can start a CLI via Docker.
And we create a compacted topic:
1
2
3
4
5
6
7
8
9
10
11
kafka-topics.sh \
    --create \
    --bootstrap-server kafka:9092 \
    --topic kimtopic \
    --partitions 1 \
    --replication-factor 1 \
    --config cleanup.policy=compact \
    --config delete.retention.ms=1 \
    --config min.compaction.lag.ms=1 \
    --config max.compaction.lag.ms=2 \
    --config min.cleanable.dirty.ratio=0.01
We can then see our topic configuration:
1
2
3
4
kafka-topics.sh --bootstrap-server kafka:9092 --topic kimtopic --describe

Topic: kimtopic	PartitionCount: 1	ReplicationFactor: 1	Configs: cleanup.policy=compact,segment.bytes=1073741824,max.compaction.lag.ms=2,min.compaction.lag.ms=1,min.cleanable.dirty.ratio=0.01,delete.retention.ms=1
    Topic: kimtopic	Partition: 0	Leader: 1001	Replicas: 1001	Isr: 1001
If we want to modify our topic configuration we can use kafka-configs:
1
kafka-configs.sh --bootstrap-server kafka:9092 --alter --topic kimtopic --add-config  min.cleanable.dirty.ratio=0.001
We can then test our topic with Kafkacat by using -K: to specify the key delimiter:
1
2
3
kafkacat -P -b localhost:9094 -t kimtopic -K:
1:foo
2:bar
Start our consumer:
1
2
3
4
❯ kafkacat -C -b localhost:9094 -t kimtopic
foo
bar
% Reached end of topic kimtopic [0] at offset 2
Then we can put a tombstone on the producer with 1: (a key with no value). When we restart the consumer we see the first message and the tombstone:
1
2
3
4
5
❯ kafkacat -C -b localhost:9094 -t kimtopic
foo
bar

% Reached end of topic kimtopic [0] at offset 3
Then we can add more logs to reach the ratio:
1
2
3
4
5
6
7
8
9
10
11
12
❯ kafkacat -P -b localhost:9094 -t kimtopic -K:
1:foo
2:bar
1:
3:3 # we continue to add from here
4:4
5:5
6:6
7:7
8:8
9:9
10:10
And when we restart our consumer we see that the first log of key 1 was compacted away:
1
2
3
4
5
6
7
8
9
10
11
12
❯ kafkacat -C -b localhost:9094 -t kimtopic
bar

3
4
5
6
7
8
9
10
% Reached end of topic kimtopic [0] at offset 11
Note that the offsets are still maintained, the only offsets removed are the ones removed with their associated logs. And that concludes today’s post!
Conclusion
Today we looked at how log compaction worked in Kafka. We started by defining what compaction was and in which situation does it become useful. We then setup a local Kafka in docker and looked into how we could create a compacted topic and do some testing against it with Kafkacat. Hope you liked this post and I see you on the next one!
Kafka Posts
- Introduction to Kafkacat CLI for Kafka
- Local Kafka Docker Setup
- Kafka Consumer and Producer in dotnet
- Kafka Schema Registry with Avro
- Kafka Topics, Partitions and Consumer Groups
- Kafka Offsets and Statistics
- Kafka Log Compaction


